ESP8266
Adafruit ESP8266 Feather Huzzah
L'ESP8266 è un microcontrollore economico con tecnologia Wi-Fi, prodotto dalla Espressif di Shangai.
L’Adafruit ESP8266 Feather Huzzah è una scheda basata sul chip ESP8266 con processore impostato a 80 MHz e tensione logica di 3.3V.

La repository con i codici è disponibile su GitHub
Connessione Wi-Fi
Per una panoramica sul funzionamento delle reti, indirizzi IP e risorse web si veda la pagina Internet e reti.
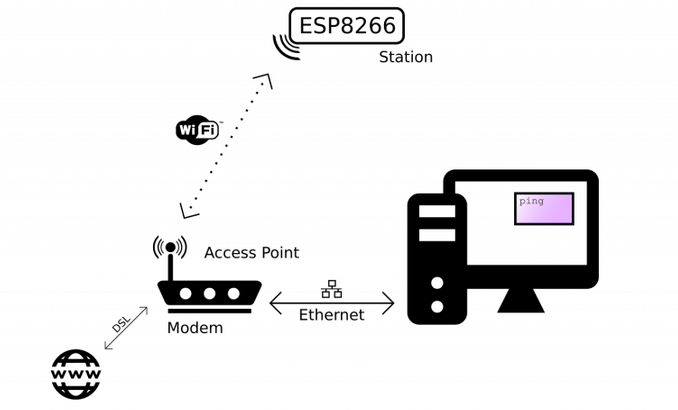
L’ESP8266 può stabilire una connessione Wi-Fi, in particolare supporta tre diverse modalità di connessione:
- station mode;
- soft-Access Point mode;
- Web Server (soft-AP + station) mode;
Station mode
In modalità station mode l’ESP8266 può connettersi a una rete esistente, basta fornire nel codice l’identificativo SSID della rete e la password per l’accesso alla rete.
Il codice utilizza la libreria ESP8266WiFi.h che fornisce le funzioni necessarie a gestire una connessione Wi-Fi, per esempio per connettersi a una rete l’istruzione che si utilizza è del tipo WiFi.begin(ssid, password);
// Include the Wi-Fi library
#include <ESP8266WiFi.h>

// The SSID (name) of the Wi-Fi network you want to connect to
const char* ssid     = "test";
// The password of the Wi-Fi network
const char* password = "untepertutti";

void setup() {
  // Start the Serial communication to send messages to the computer
  Serial.begin(115200);
  delay(10);
  Serial.println('\n');

  // Connect to the network
  WiFi.begin(ssid, password);
  Serial.print("Connecting to ");
  Serial.print(ssid); Serial.println(" ...");

  // Wait for the Wi-Fi to connect
  int i = 0;
  while (WiFi.status() != WL_CONNECTED) {
    delay(1000);
    Serial.print(++i); Serial.print(' ');
  }
  Serial.println('\n');
  Serial.println("Connection established!");
  Serial.print("IP address:\t");
  // Send the IP address of the ESP8266 to the computer
  Serial.println(WiFi.localIP());
}

void loop() {
  ;
}
Una volta connesso all’ESP8266 verrà assegnato un indirizzo IP (IP address) e costituirà un nuovo nodo della rete locale.
Se dalla IDE di Arduino si apre si apre il monitor seriale (Tools > Serial monitor) sarà possibile vedere l’indirizzo associato al dispositivo sul quale l’ESP8266 risponderà correttamente al ping.


Un ESP8266 connesso in modalità station mode può essere utilizzato come web client per eseguire delle richieste a degli web server accessibili attraverso l'access point della rete a cui è connesso, per esempio se vogliamo costruire una stazione meteorologica possiamo avere dei sensori connessi direttamente al microcontrollore ma alcuni parametri potrebbero essere recuperati tramite Internet da dei server dati.
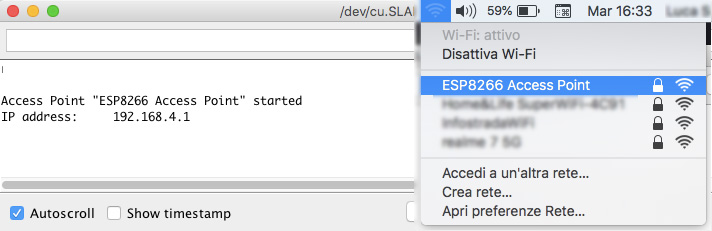
soft-Access Point mode (AP-mode)
L’ESP8266 può essere utilizzato come access point e stabilire dunque una propria rete Wi-Fi.
Questa modalità risulta utile quando non si ha la necessità di essere connessi a Internet ma si ha bisogno che altri dispositivi si colleghino all’ESP8266 tramite connessione Wi-Fi.
Questo è il caso per esempio di una lampada RGB controllabile via Wi-Fi da un’applicazione web, vedi il paragrafo Controllare una lampada RGB da una web-app.
Nel codice che segue verrà creata una rete Wi-Fi di cui l’ESP8266 costituirà il nodo principale, il gateway.
// Include the Wi-Fi library
#include <ESP8266WiFi.h>

// The name of the Wi-Fi network that will be created
const char* ssid = "ESP8266 Access Point";
// The password required to connect to it, leave blank for an open network
const char* password = "thereisnospoon";

void setup() {
  Serial.begin(115200);
  delay(10);
  Serial.println('\n');

  // Start the access point
  // the ESP8266 AP will be given the default address 192.168.4.1
  WiFi.softAP(ssid, password);
  Serial.print("Access Point \"");
  Serial.print(ssid);
  Serial.println("\" started");

  Serial.print("IP address:\t");
  // Send the IP address of the ESP8266 to the computer
  Serial.println(WiFi.softAPIP());
}

void loop() {}
Tramite un dispositivo con connessione Wi-Fi è possibile connettersi alla rete generata dall’ESP8266 – nell’esempio alla rete ESP8266 Access Point – ma se con un browser adesso proviamo a connetterci a un sito web riceviamo un messaggio di errore, perché l’ESP8266 non è direttamente connesso a Internet.
Web Server, ovvero sia servire pagine web con un ESP8266
Un web server è una macchina in grado di ricevere delle richieste e da parte di un client (in genere un browser) e di restituirgli delle risposte, in genere delle pagine web.

Quello che succede dietro le quinte quando digitiamo l’indirizzo di una pagina web oppure selezioniamo uno dei risultati forniti da un motore di ricerca, è che la nostra macchina – il client – effettua attraverso il browser una richiesta al web server a cui ci siamo connessi e questo risponde alla richiesta restituendo al client la pagina richiesta che sarà visualizzata nel browser.
Il client stabilisce una connessione con il web server e lo scambio di dati è regolato da un protocollo di comunicazione: in questo caso in generale viene utilizzato il protocollo HTTP (hyper-text transfer protocol).
Per richiedere dati da un server si utilizza il metodo (la funzione) GET del protocollo HTTP, mentre per inviare dati a un server è necessaria una richiesta di tipo POST.
Servire pagine web con l’ESP8266
Una volta che l’ESP8266 è connesso a una rete locale in modalità station mode è possibile creare un web server che permetta di servire pagine web con l’ESP8266.
Per far questo va utilizzata la libreria ESP8266WebServer.h che mette a disposizione l’istruzione ESP8266WebServer server(80); per creare un web server che risponde sulla porta 80 della macchina a cui è stato associato l’indirizzo IP WiFi.localIP() sulla rete locale; il server viene poi fatto partire con il comando server.begin();.
#include <ESP8266WiFi.h>
#include <WiFiClient.h>
// Include the WebServer library
#include <ESP8266WebServer.h>

// Create a webserver object that listens for HTTP request on port 80
ESP8266WebServer server(80);

// network parameter
const char* ssid = "test";
const char* password = "untepertutti";

// function prototypes for HTTP handlers
void handleRoot();
void handleNotFound();

void setup(void){
  // Start the Serial communication to send messages to the computer
  Serial.begin(115200);
  delay(10);
  Serial.println('\n');

  // connect to Wi-Fi network
  WiFi.begin(ssid, password);
  Serial.println("Connecting ...");
  int i = 0;
  // Wait for the Wi-Fi to connect
  while ( WiFi.status() != WL_CONNECTED) {
    delay(1000);
    Serial.print('++i');
    Serial.print(' ');
  }
  Serial.println('\n');

  // Tell us what network we're connected to
  Serial.print("Connected to ");
  Serial.println(WiFi.SSID());
  Serial.print("IP address:\t");
  // Send the IP address of the ESP8266 to the computer
  Serial.println(WiFi.localIP());

  // Call the 'handleRoot' function when a client requests URI "/"
  server.on("/", handleRoot);
  // When a client requests an unknown URI (i.e. something other than "/"), call function "handleNotFound"
  server.onNotFound(handleNotFound);

  // Actually start the server
  server.begin();
  Serial.println("HTTP server started");
}

void loop(void){
  // Listen for HTTP requests from clients
  server.handleClient();
}

void handleRoot() {
  // Send HTTP status 200 (Ok) and send some text to the browser/client
  server.send(200, "text/plain", "Hello world!");
}

void handleNotFound(){
  // Send HTTP status 404 (Not Found) when there's no handler for the URI in the request
  server.send(404, "text/plain", "404: Not found");
}
Se per esempio all’ESP8266 è stato associato l’indirizzo IP 192.168.1.69, possiamo connetterci al server con un browser, inserendo nella barra degli indirizzi del browser l’indirizzo http://192.168.1.69.

Il server gestirà la connessione attraverso l’istruzione server.on("/", handleRoot); che risponde alla richiesta del client con il codice della funzione handleRoot() ovvero sia Server.send(200, "text/plain", "Hello world!"); che invia al browser il testo Hello world!.
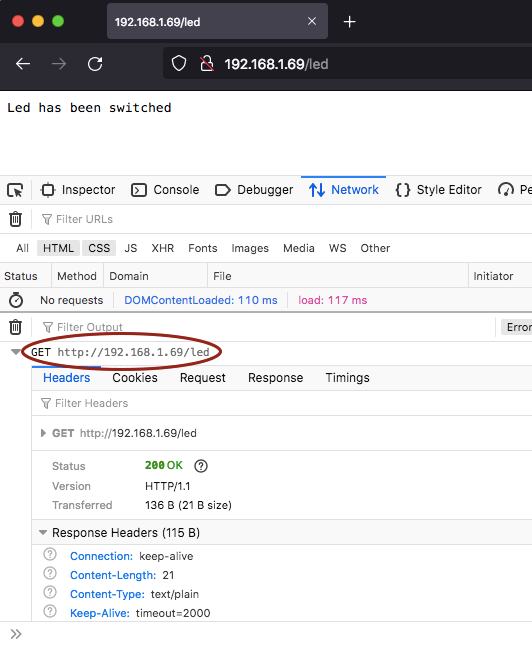
Un web server per controllare l’ESP8266 via Wi-Fi
E' possibile controllare l’ESP8266 attraverso un web server creando un’opportuna richiesta che sfrutti il metodo GET del protocollo HTTP.
Nel codice che segue vediamo come utilizzare il metodo GET per inviare una particolare richiesta al server che risponderà cambiando lo stato del LED che si trova a bordo della scheda Adafruit ESP8266 Feather Huzzah, conneso al pin 0 – se il LED è spento viene acceso e viceversa, se è acceso viene spento (toggle led state).
#include <ESP8266WiFi.h>
#include <WiFiClient.h>
// Include the WebServer library
#include <ESP8266WebServer.h>

// Create a webserver object that listens for HTTP request on port 80
ESP8266WebServer server(80);

// network parameter
const char* ssid = "Let me in";
const char* password = "remandkurt";

// function prototypes for HTTP handlers
void handleRoot();
void handleSwitchLED();
void handleNotFound();

void setup(void) {
  // Configure pin 0 as output and initialize it as switched-off
  pinMode(0, OUTPUT);
  delay(100);
  digitalWrite(0, LOW);

  // Start the Serial communication to send messages to the computer
  Serial.begin(115200);
  delay(10);
  Serial.println('\n');

  // connect to Wi-Fi network
  WiFi.begin(ssid, password);
  Serial.println("Connecting ...");
  int i = 0;
  // Wait for the Wi-Fi to connect
  while ( WiFi.status() != WL_CONNECTED) {
    delay(1000);
    Serial.print('++i');
    Serial.print(' ');
  }
  Serial.println('\n');

  // Tell us what network we're connected to
  Serial.print("Connected to ");
  Serial.println(WiFi.SSID());
  Serial.print("IP address:\t");
  // Send the IP address of the ESP8266 to the computer
  Serial.println(WiFi.localIP());

  // Call the 'handleRoot' function when a client requests URI "/"
  server.on("/", handleRoot);
  server.on("/led", handleSwitchLED);
  // When a client requests an unknown URI call function "handleNotFound"
  server.onNotFound(handleNotFound);

  // Actually start the server
  server.begin();
  Serial.println("HTTP server started");
}

void loop(void){
  // Listen for HTTP requests from clients
  server.handleClient();
}

void handleRoot() {
  // Send HTTP status 200 (Ok) and send some text to the browser/client
  server.send(200, "text/plain", "Hello world!");
}

void handleSwitchLED() {
  // Handle the request
  digitalWrite(0, !digitalRead(0));
  server.send(200, "text/plain", "Led has been switched");
}

void handleNotFound(){
  // Send HTTP status 404 (Not Found) when there's no handler for the URI in the request
  server.send(404, "text/plain", "404: Not found");
}
La richiesta viene inviata come un particolare indirizzo web, in questo caso http://192.168.1.69/led che il web server gestirà con il comando server.on("/led", handleSwitchLED);, accendendo il LED e restituendo un messaggio all’utente del tipo Led has been switched:
void handleSwitchLED() {
  // Handle the request
  digitalWrite(0, !digitalRead(0));
  server.send(200, "text/plain", "Led has been switched");
}
Creare una rete locale con l’ESP8266 per controllare una lampada RGB da una web-app
Consideriamo adesso il problema di progettare una lampada RGB di cui sia possibile variare a distanza, senza fili, il colore.
Il progetto può essere risolto integrando nella base della lampada RGB un microcontrollore con connessione Wi-Fi, del tipo dell’ESP8266: l’utente potrà modificare il colore della lampada da un dispositivo collegato via Wi-Fi alla rete locale generata dalla lampada, tramite un’applicazione web (web app) accessibile da un qualsiasi browser.
L’ESP8266 dovrà essere configurato in modalità soft-Access Point, così da poter creare la propria rete Wi-Fi, e dovrà anche comportarsi da web server per rendere disponibile (servire) l’applicazione web per il controllo della lampada ai dispositivi connessi.
Il codice principale che girerà sull’ESP8266 (il firmware) dovrà configurare il dispositivo come soft-Access Point e inoltre come web server in grado di servire l’applicazione web per il controllo via Wi-Fi della lampada.
#include <ESP8266WiFi.h>
#include <ESP8266WebServer.h>
#include <WebSocketsServer.h>

// Include web-app
#include "led-control-app.h"

// Create a webserver object that listens for HTTP request on port 80
ESP8266WebServer server(80);
// create a websocket server on port 81
WebSocketsServer webSocket(81);

// The name of the Wi-Fi network that will be created
const char *ssid = "ESP8266 Access Point";
// The password required to connect to it, leave blank for an open network
const char *password = "thereisnospoon";

// specify the pins with an RGB LED connected
#define LED_RED     15
#define LED_GREEN   13
#define LED_BLUE    12

// the pins with LEDs connected are outputs
void setup() {
  pinMode(LED_RED, OUTPUT);
  pinMode(LED_GREEN, OUTPUT);
  pinMode(LED_BLUE, OUTPUT);

  // Start the Serial communication to send messages to the computer
  Serial.begin(115200);
  delay(1000);

  // Start a Wi-Fi access point
  startWiFi();

  // Start a WebSocket server
  startWebSocket();

  // Start a HTTP server with a file read handler and an upload handler
  startServer();
}

void loop() {
  // constantly check for websocket events
  webSocket.loop();

  // run the server
  server.handleClient();
}

// Start a Wi-Fi access point
void startWiFi() {
  // Start the access point
  WiFi.softAP(ssid, password);
  Serial.print("Access Point \"");
  Serial.print(ssid);
  Serial.println("\" started\r\n");

  Serial.print("IP address:\t");
  // Send the IP address of the ESP8266 to the computer
  Serial.println(WiFi.softAPIP());
}

// Start a WebSocket server
void startWebSocket() {
  // start the websocket server
  webSocket.begin();
  // if there's an incomming websocket message, go to function 'webSocketEvent'
  webSocket.onEvent(webSocketEvent);
  Serial.println("WebSocket server started.");
}

// Start a HTTP server with a file read handler and an upload handler
void startServer() {
  server.on("/", handleRoot);
  server.onNotFound(handleNotFound);          // if someone requests any other file or page, go to function 'handleNotFound'

  // start the HTTP server
  server.begin();
  Serial.println("HTTP server started.");
}

void handleRoot() {
  String htmlPage = webpageCode;
  server.send(200, "text/html", htmlPage);
}

// if the requested file or page doesn't exist, return a 404 not found error
void handleNotFound(){
  server.send(404, "text/plain", "404: File Not Found");
}

// When a WebSocket message is received
void webSocketEvent(uint8_t num, WStype_t type, uint8_t * payload, size_t lenght) {
  switch (type) {
    // if the websocket is disconnected
    case WStype_DISCONNECTED:
      Serial.printf("[%u] Disconnected!\n", num);
      break;
    // if a new websocket connection is established
    case WStype_CONNECTED: {
        IPAddress ip = webSocket.remoteIP(num);
        Serial.printf("[%u] Connected from %d.%d.%d.%d url: %s\n", num, ip[0], ip[1], ip[2], ip[3], payload);
      }
      break;
    // if new text data is received
    case WStype_TEXT:
      Serial.printf("[%u] get Text: %s\n", num, payload);
      // we get RGB data as hex #rrggbb string
      int number = (int) strtol((const char *) &payload[1], NULL, 16);
      // int number = (int) strtol( &payload[1], NULL, 16);

      // Split them up into r, g, b values
      int red = (int) ((number >> 16) * 1024.0/255.0);
      int green = (int) ((number >> 8 & 0xFF) * 1024.0/255.0);
      int blue = (int) ((number & 0xFF) * 1024.0/255.0);
      Serial.printf("(R:%d, G:%d, B:%d)\n",red, green, blue);

      analogWrite(LED_RED,   red);
      analogWrite(LED_GREEN, green);
      analogWrite(LED_BLUE,  blue);
      break;
  }
}
Per rendere la comunicazione con la lampada più snella e veloce si è deciso di utilizzare la WebSocket API dell’HTML5 (WebSockets), una tecnologia che permette di avere una sessione di comunicazione interattiva bi-direzionale tra il server web e il browser dell’utente.
L’applicazione web è basata su HTML5/CSS/JavaScript e il codice è quello presente di seguito.
<!doctype html>
<html lang="en">
<head>
  <meta charset="utf-8">
  <meta name="viewport" content="width=device-width, initial-scale=1">
  <meta name="description" content="WebSocket interface for a RGB Arduino-controlled LED">
  <meta name="author" content="Luca Sguanci">
  <title>WebSocket interface for a RGB Arduino-controlled LED</title>
  <!-- Bootstrap core CSS -->
  <!-- <link rel="stylesheet" href="https://stackpath.bootstrapcdn.com/bootstrap/4.3.1/css/bootstrap.min.css" integrity="sha384-ggOyR0iXCbMQv3Xipma34MD+dH/1fQ784/j6cY/iJTQUOhcWr7x9JvoRxT2MZw1T" crossorigin="anonymous"> -->
  <style>
    h3 {
      font-size: 120%;
      text-align: center;
      margin: 2em auto;
    }
    .row {
      margin-bottom: 1em;
    }
    .col-sm {
      text-align: center;
    }
    button {
      margin-top: 2em;
    }
  </style>
</head>

<body>
  <h3>Control a RGB LED color</h3>
  <div class="container">
    <!-- red -->
    <div class="row">
      <div class="col-sm">
        <label for="redField">Red</label>
      </div>
      <div class="col-sm">
        <input type="range" id="red" name="redField" min=0 max=255 step=1 />
      </div>
    </div>
    <!-- green -->
    <div class="row">
      <div class="col-sm">
        <label for="greenField">Green</label>
      </div>
      <div class="col-sm">
        <input type="range" id="green" name="greenField" min=0 max=255 step=1 />
      </div>
    </div>
    <!-- blue -->
    <div class="row">
      <div class="col-sm">
        <label for="blueField">Blue</label>
      </div>
      <div class="col-sm">
        <input type="range" id="blue" name="blueField" min=0 max=255 step=1 />
      </div>
    </div>
    <!-- button -->
    <div class="row">
      <div class="col-sm">
        <button type="button" class="btn btn-primary" id="changeColorBtn">Change color</button>
      </div>
    </div>
  </div>
  <!-- JS -->
  <!-- if needed include jQuery, Popper and Bootstrap -->
  <!-- Custom JS code -->
  <script>
    // comment to work disconnected from the ESP8266
    var connection = new WebSocket('ws://' + location.hostname + ':81/', ['arduino']);
    // uncomment to work disconnected from the ESP8266
    // var connection = new WebSocket('ws://localhost:81/', ['arduino']);
    connection.onopen = function () {
      connection.send('Connect ' + new Date());
    };
    connection.onerror = function (error) {
      console.log('WebSocket Error ', error);
    };
    connection.onmessage = function (e) {
      console.log('Server: ', e.data);
    };
    connection.onclose = function () {
      console.log('WebSocket connection closed');
    };

    const redSlider = document.getElementById("red");
    redSlider.addEventListener("change", changeColorHandler);
    const greenSlider = document.getElementById("green");
    greenSlider.addEventListener("change", changeColorHandler);
    const blueSlider = document.getElementById("blue");

    const btn = document.getElementById('changeColorBtn');

    var color = Array();
    var colorString = new String();

    blueSlider.addEventListener("change", changeColorHandler);
    function changeColorHandler() {
      console.log("inside");
      var r = document.getElementById('red').value;
      var g = document.getElementById('green').value;
      var b = document.getElementById('blue').value;
      color = [];
      color.push(parseInt(r).toString(16).padStart(2,'0'));
      color.push(parseInt(g).toString(16).padStart(2,'0'));
      color.push(parseInt(b).toString(16).padStart(2,'0'));
      colorString = '#';
      for (var i=0; i<color.length; i++) {
         colorString += color[i];
      }
      console.log("Color: "+colorString);
      btn.style.backgroundColor = colorString;
    }

    btn.addEventListener('click', function(e) {
      console.log("Color: "+colorString);
      connection.send(colorString);
    });
  </script>
</body>
</html>
In particolare l’applicazione si connetterà attraverso i WebSockets al server per variare il colore della lampada, var connection = new WebSocket('ws://' + location.hostname + ':81/', ['arduino']);.
La pagina web viene inclusa nel codice che girerà sul microcontrollore come libreria esterna #include "led-control-app.h"
mini-R
mini-R è un robot controllato via Wi-Fi e costruito attorno al kit Adafruit Mini Robot Rover Chassis Kit, 2WD with DC Motors.
Al centro del progetto si trova un Adafruit ESP8266 Feather Huzzah impostato in modalità soft-AP e controllato tramite una web-app.